Wednesday, February 27, 2013

Walker Master Cp - the 6 channel learning heli

Yes, finally a review about one of my favorite helis…
Actually, all I wanted was a decent transmitter for a 450 build project, and since I got a good deal with the Master CP, I bit the bullet and got my Devo10 bundled with a Master CP…I am happy I did so…
So, there are thons of infos on the Master CP, and I think it had great success so far, what else can be said?
For a start, if you are used with a 4 channel heli, or you want to start directly with the 6 channel helis, and don’t have budget for a smaller heli like Mini CP or Genius CP, then, yes, the Master CP is the way to go…It is a 250 size heli, with brushed motors(main and tail), and has a 6 axis gyro system. I’ve seen moviesself leveling, but mine doesn’t do this much, what it does on the other hand is it hovers very easy and stable.
Sometimes it is so easy, that I’m wondering if I actually learn anything by flying it, that I can use on my 450 helis...
I want to say that it is build to last: starting from the tough landing skids, strong tail boom, strong main blades-reinforced with carbon fiber, and ending with the flexible tail blade and flexible canopy, it’s all there. But since it is made so strong to handle crashes during learning, it adds also a bit on the weight side, making it less agile than a TREX-250 for example. But I would say this difference is visible only in 3D flight, normal hovering and circuits flight, they would be the same. I know many of you would say
that the comparison is wrong, because the 250 rex has a brushless motor and belt tail, but I just wanted to compare it with a similar class size heli…
Despite many owners consider a brushless up-grade, I don’t think this is necessary, since the motor is used on a 400 size walkera and it delivers enough power, without being too hot. The tail motor wears out normally faster, but walkera designed a simple replacement system, that doesn’t  require any soldering, it’s just simple to replace the tail motor. Regarding tail authority, the tail holds well, but obviously you cannot compare with a tail or torque driven tail. I can remember that since I was used to my little V911, I got it home, and I spool it in my living (don’t do this because this is not suitable for indoor) and the tail didn’t spin? Of course that I didn’t took off knowing what no tail would mean in the air !
Later I found out that in the case of the Master CP, this behavior is normal, and it only spins in the air…so if you have similar issue, well it’s not an issue really…
Getting to the battery: I got mine without any branding on it, just plain black, so I doubt it’s a Walkera original battery, this battery has maybe 10 flights only and cannot keep the heli in the air for more than 30 seconds, even tough the voltage is enough…luckily, and I recommend you this, I bought some Zippy Rhino 1050mAh li-po packs that fly and hold really well….good investment for this heli…after 5 minutes of flying you still have 3.88-3.90V in them…

Specifications:
1. Main Rotor Diameter : 462mm
2. Tail Rotor Diameter : 113 mm
3. Overall Length : 440mm
4. All-up Weight : 420g (including battery)
5. Suitable Battery : 11.1V 900-1100mAh Li-Po depending on shape and size
6. Main Motor : 380PF
7. Tail Motor : 1627PF
8. GYRO : 6-axis
9. Receiver : RX-2637H-D
10. Servo : WK-7.6-6
11. Transmitter : DEVO Series compatible


What I like:
-stable hovering
-strong built, takes crashes easy;
-compact size

What I don’t like
-servos strip really easy-don’t move them by hand
-canopy looks nice, but it’s not so easy for seeing the orientation of the heli

Below I put the pictures with different angles so you have a good picture on what to expect if you buy one....notice the blade tips that still fly and track well


Front view- the Devo 10 i for size reference

Right side view

Rear view

Left side view


Plenty of power in the stock brushed motor

The receiver and 6 channel gyro

Quite good tail lock

Front view

Front right hand side detail

The bad servos, already 2 stripped in my case, but I could fix them

Upper view

Bottom view

The Walkera ESC, that unfortunately has a sloooow cut off, be  carefull

Tail motor detail, easy to replace

Big main gear teeth that so far proved durable

Like I said, not many helis can fly spot on with blades like this one...

This is the unboxing and the small movie I made:


I hope you found this info useful and hope you join the club J
Untill next time happy flying and bue sky !

Tuesday, February 26, 2013

WL toys V911 - best bang for the buck 4 channel FP

V911 bundle package, usually comes with 2 batts, main blades, tail blades+USB charger
  Hello again,
So you want to know more about the WL toys V911?
I will have to tell a small personal story, that all started in September 2012 when I was on a business trip to Shanghai. This time it happened: I bought my first coaxial heli, an DFD F-161 heli, and to get it, I asked all the chinese sellers: best? Best? And their answer was yes J. I had the flying bug in me since young age by reading all my father”s aeronautical magazines, but this time I just reached my hand and grabbed my first R/C toy.
After getting back home, in a very short time against my wife’s desperation, I told myself: hey, this is a small heli, I want something bigger, and to be honest I read many other people that did just like me; guess what: I bought a 450 size ! heli, an Esky Belt CPX… That was really something…big noisy and intimidating and wrong…
After starting to read and understand more about R/C  helis, I realized I took too many steps ahead and I was soooo wrong by doing so…
Finally, to end this small story: I bought the right heli: the V911…yes, it should be a lesson learnt for all, and the channel numbers are made with a purpose: 3.5 CH, 4 CH, 6CH and more…
Dear friends: follow this rule and you will be safe with the learning curve…If you already have a coaxial, or you just want to start in this (expensive) hobby, the V911 or any other 4 channel heli is the way to go. Being so small is great for indoor practice, and also due to it’s weight it takes crashes easily, just make sure you close the throttle when things go South J Don’t’ jump buying big helis like my 6 channel because it will only lead to frustration and no learning, unless you really have a lot of free time and a simulator…
As an advice, I can only tell you that the sparts parts I needed were blades and flybar, both of these breaking due to multiple crashes. The frame and the two small servos had no issue at all. I recommend using the small V911 indoors only, even tough they claim it can fly outdoors too( maybe only in no wind like the coax heli), and you can just improve your hovering skills, and learn orientations, but you can also fly small circuits inside your room.
Just in order to clear any doubt, the V911 is a clone of the much more expensive TREX 100 heli, and if you look at the two you will find a striking resemblance (similar to “copy&paste”)
In the below picture you can find the available colour options:
 
What I like:
-RTF price is about 30 USD !
-stable indoor flier
-takes crashes easily
What I don’t like
-battery life is 3-4 minutes only
-motor is quite noisy

 V911 Specifications
1). Main Rotor Diameter: 192 mm
2). Tail Rotor Diameter: 36 mm
3). Overall Length: 220 mm
4). Height: 82 mm
5). All Up Weight: 32g
6). Battery: 3.7V Li-Po
Here you can see the movie I made so you have an idea of what’s in the box, and how it hovers.

>

Hope you enjoyed reading this, until next time : happy flying
Florin

Monday, February 25, 2013

New WL toys V913, V911"s Big Brother

V913 4 ch 2.4 Ghz FP heli and the TX


Hello,
It seems that the WL toys are into a bigger 4 channel heli that would compete in my guess with the F45 heli. This one is a giant scaled V911, with 2.g Ghz Tx and 4 channel. Similar to the little brother the V911, this bigger V913 should be even more stable, due to it's size.
Specs:
  • L / w / h 69/11/20 cm
  • battery is a 7.4V 1500 mAh li-po

Tuesday, February 12, 2013

Trex heli size comparison

Hello again,
Since there are more standard sizes out there, I will point out the most common size format for the Rc Helicopters, which is used by Align. According to their size chart you can have the following heli classes:
  • 100 size class - usually rotor diameter is 192mm
  • 250 size class - usually rotor diameter is 460mm
  • 450 size class - usually rotor diameter is 710mm
  • 500 size class - usually rotor diameter is 970mm
  • 550 size class - usually rotor diameter is 1188mm
  • 600 size class - usually rotor diameter is 1347mm
  • 700 size class - usually rotor diameter is 1562mm
  • 800 size class - usually rotor diameter is 1780mm
Align T-rex size chart for Rc helicopters


Of course there are some intermediate size heli's against the Align Trex chart, like for example the 125 size micro helicopters, like the Walkera Dragonfly, then the Walkera Master Cp which is more of a 200 class heli, and there are also the E-flite Blade 300 and 400 sizes hel's but let's just say these are some exceptions :)
Personally I have 100 size, my Genius CP V2, reviewed here which I find very good for indoor practicing in my living room, but also outside; then my Walkera Master CP which is more of a 200/250 size heli, also stable and good learning tool, since it is built to handle crashes-definitely not a living room flier, and lastly, for now, my RCX450 CF similar to the Storm heli, which I converted from flybar to flybarless.
According to each one's budget you can get the heli you want, of course the bigger the class, the better in terms of stability, but more expensive would be the "maintenance fee"  for it.

Another more "general" classification is made based on the weight and rotor diameter of the heli, as follows:

  • Sub-micro (under 100g,  less than 200mm rotor diameter);
  • Micro (under 500g, less than 500mm rotor diameter) - a 250 size heli is in this category;
  • Miniature (under 1kg, less than 800mm rotor diameter)-usually the 450 class is here;
  • Small (under 2kg, less than 1000mm rotor diameter)-the 500 size heli is in this category;
  • Normal (under 4kg, less than1500mm rotor diameter)-the 600 size heli is in this category;
  • Large (under 6kg, less than 2000mm rotor diameter)-both 700 and 800 size helis belong to this category.

Hope this info is helpful, since when I started this hobby the sizes was a very confusing topic to me...
Thanks and happy flying to all,

Saturday, February 9, 2013

Throttle and pitch curves tutorial

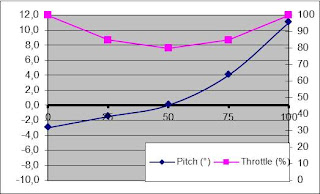
Normal mode with Pitch in blue and THR in pink, L stick is at 0, M is at 50 and H is at 100.
Hello again,
I know there are a ton of info on the web regarding this topic, but I will try to explain in a more beginner friendly manner.
Let me start with the assumption that you have a digital transmitter with the function that allows you to acces throttle and pitch curves, and that you mechanically did your swash and pitch to be on 0 at mid stick.
Ok, now to the theory part :)
As you might now, the simple 4 channels or even coaxial rc helicopters have the throttle on the stick and nothing more…Switching to the 6 or more channels heli, things change a bit, and let’s start with the name:
CCPM ?! if you wondered what this stands for, it translates to Collective/Cyclic Pitch Mixing and with this you can give both throttle input and also cyclic input in one transmitter channel…Nice… When I first bought my Esky Belt CPX, I remember somebody telling me that the best up-grade I can do to it is not metal rotor head, but a digital TX, boy he was right.
Now, you already know some basic things, which is good, and I will explain about these curves, but first:…
You must also understand that the 6 channel heli’s have at least 2 flight modes : Normal and Idle up mode (or sport, 3D etc…); some TX have more than 1 Idle up mode, for example my Walkera Devo 10 has 2 IDLE up modes first one for just simple flight, second one for full 3 d flight.
Normal mode is used most of the times for hovering and taking off/ landing most of the time, and Idle up is used for forward flight and 3d flight, meaning all kind of nice aerobatics that a heli can do over a plane.
It is important to understand the available flight modes, because based on this you will set-up the throttle and pitch curves for each of them.
Ok, enough info, let’s get to real business here…First, we will look on the normal mode since it is the place to start with, so to speak.
As you know there should be a minimum of 3 points for any throtthe or pitch curves, more high-end radios have 17 points or more, but we are not 3d world champs, yet :)
You need the lowest position of the throttle stick, usually named “L”, then the medium position, usually named “M” which is exactly at the mid-stick position, and the highest position of the stick named “H” where your motor is at maximum power output. You can define, exactly how much throttle you want for each of these three positions, and the transmitter will calculate the connecting points with a straight liniar line, so you don’t have to worry about it. Now depending on how you wish to have it , you might have 0% throttle at L, (for example in Genius CP heli, at 0 and no throttle subtrims to lower maximum position, the motor will start) or negative throttle value, using throttle subtrim which I recommend and is safer. Also for H position, I don’t recommend keeping it to 80-90% max, since the ESC will not like it too much, better option is to use a smaller motor pinion if your head speed is too high. It may seem complicated but it is actually simple and I hope it makes sense so far. You can find many examples on different THR curves, I am focusing on making you understand how things work. Ok, enough with throttle curve for normal mode, let’s talk about idle up. In IDL up mode the throttle curve is at 100% maximum values at each L or H stick position, and anywhere between 50 to 100% at mid stick. This means you have full power at the ends for fast lift and down speed, but a bit milder in the middle since this is the point where in IDL up the pitch curve is changing. You can understand how THR curve works better from below diagrams: 


IDL 1, with -3 deg pitch at L stick, 0 pitch at M and +11 at H stick. THR curve is pink with with 100% at L and H and 85% at M stick


IDL 2, with -11/+11 pitch at L/H stick, and 95% THR at midstick, usefull for hard 3D flight
 
Ok, now a quick summary: Normal mode, you have 0% or better -10% throttle on the L stick, and based on preference maybe 50% THR on M and 100% on H stick
For IDL up you have -100% on L stick, 50-100% on M and 100% on H stick
One more mention before moving on to Pitch curves, about governors. This is a nice feature that some ESC have, and by enabling this, you have constant head speed, kind of similar to a cruise control in your car…you set it up to a value, and the ESC will try keeping it to that(usually 100&) no matter what motor load you have.

Now, moving on to my favourite part: the pitch curves.
As you already know, on a 6 channel CCPM heli, by moving the throttle stick, you also change the blades pitch, that create lift, either positive or negative. A good way to observe the pitch changing is by UNPLUGGING your motor, or by setting up Throttle hold pitch curve to have -11 to +11 degrees pitch at L and H stick positions, and then you can safely observe the blades pitch change with throttle stick movement.
So, again, in the normal flight mode, I suggest having around -2 or -1 degrees pitch al L stick, enabling you to land even in stronger winds that will lift your helicopter, and slowly transition to 0 pitch at M stick, and finally +100% pitch at H stick. Many people don’t do this, and have +1/+2 positive at L stick, maybe 5 degrees at M stick and +11 degrees at H stick. Having this, when you switch to IDL up mode with the stick in M position the heli will jump down because of the pitch difference… I recommend that after M stick position, the pitch curves to be identical for Normal and IDL up flight modes like 50% - M and 100% H stick. An usual IDL up curve for 5 points transmitter would be 0%-L 25% 50%-M 75% 100%-H, meaning you have maximum negative at L stick, 0 at M stick and maximum positive at H stick.
If your transmitter has the pitch range from -100% to +100% then the -100% should be considered as you maximum negative pitch setting, 0 should be set for M stick and +100% should be the maximum pitch setting. The main difference for IDL up is that as you remember for maximum stick positions, L and H you have maximum throttle for the motor, also for the same L and H you should set-up to have maximum pitch to match with the throttle curve, enabling you for example to have enough lift for upside down flight. Personally, I have IDL up 1 where I only set-up -3 negative to +11 positive at both ends, this is allowing me to do nice forward flight and circuits, and -11 negative to +11 positive in IDL up 2 for upside down flying and hard 3d.
I really hope that it is all clear for you now, and it will help you understand how you can set up your own curves based on your own preference and liking.
Until next time happy flying and blue sky !


Monday, February 4, 2013

Using Devo receiver on non walkera heli


             Hello All,
A good thing happening, is that Walkera seems to improve the quality of their products, anong wich the relatively new transmitter, the DEVO 10. I decided like probably many other to trust this TX and use it on my bigger size heli(450 size) and not only on the Walkera heli’s like my Master CP or my Genius CP V2.
So far no issue, and no regrets, only downside would be a limited amount of “how to” info’s compared for example with Spektrum or Futaba gear.
Since I struggled a bit, to figure out the connection settings and setup for my 450 build using my Devo 10 and RX-1002 receiver, I think somebody else can find this info as useful, and I will explain below how I connected everything for a 6 channel CCPM helicopter, in my case the elevator being in front of the swashplate…

ELEV : connect the elevator servo,
AILE : connected the front left servo
THRO : connected the ESC
RUDD : connected the main GYRO wires
GEAR: nothing connected here (in my setup, I assigned the AUX2 for Gain, and the MIX switch since it has 2 position for setting up)
AUX 1 : connected the right servo or pitch channel
AUX 2 : connected the gyro gain wire(single wire)

One important thing to look after is the orientation of the pins, since on some servos it is white or yellow wire which is assigned for the signal wire (you need this later if you convert it to flybarless like my case), the power is always the red colour wire in the middle, and the negative is the black or brown on some other servos.
You must connect always with the white (signal wires) towards the receiver label, and also my advice is to use a foam on the frame to fit the receiver on, without tension in the wires.
I hope this short guide was usefull to you , and until next time I wish you all happy flying and blue sky.


Sunday, February 3, 2013

New Genius CP V2 review and upgrades


Official photo

Hello again,
If you really can’t wait for the week-end to come, like me, to get your helis up in the air, but it’s too cold outside(at least were I live) you have two options: simulator, which after some time gets boring, and micro helicopters… Yes, the micro helis that let you enjoy flying in the warmth and comfort of your home… 
Lately, I become a new owner of the nice Walkera Genius CP V2 that I got from miracle-mart with free-shipping, which saved me about 18 usd, and also I got some nice up-grade parts, that I also plan to review for you.
Initially to be honest, I was tempted by the mini cp and recently by the super cp, but I changed my mind quickly after getting more info on these.
Don’t get me wrong, the mini is a nice toy, but as I already like the 6 axis gyro on my Master CP, I hope I will like it also on the Genius.
So, I guess many of you are asking themselves by now: hey, why should I buy the GCP V2 over the initial genius cp ? I asked myself the same question, and I will list below the differences I found apart from the new cool canopy:

  • new receiver with only 6 axis gyro vs old one with selectable 3/6 axis
  • battery and antenna connection points are glued(was an issue on the original genius which they fixed now)
  • new lighter coreless motor, that should improve flight time, by having less mass to spin
  • new 2g digital servos
  • new canopy that personally I like more than the black/red one
  • tail boom is longer ?
  • due to new receiver and firmware tail holds much better
 Like I said, the upgrade parts will be fitted on the heli and reviewed at a later time, so stay tuned.

Most common modifications done the the GCP which from my point of view worth considering should be:
1.Brushless conversion
There are countless versions of conversions, among which also an official Walkera kit. At the moment of this review my heli is stock, but I will update if and when I will do this mod…The main benefits would be more power, and theoretical flight time improvement…

2. Landing skids mod.
Since the skids and in the same piece with the frame, which was a major complain from many genius owners to walkera, they released the V2 with the same bad skids design. If the skids break on some tough landings, you have to replace the full frame, which is a costly operation, financially and time wise…So, apparently the best skids saver is to have a wire run through your skids end, front and back and fix it to the ends of the skids using normal heat shrink sleeve that is very light…By doing this the energy from a crash is distributed evenly in the skids and frame…and according to many owners it is really a good idea…

3. Servo saver
Like many other Walkers helis the servos strip easy in a crash, not many people find handy to just get new metal servos as upgrade, due to the additional cost.
So, the solution is preety simple and it’s kind of a mechanical fuse…You just have to take off the servo arm and cut it where it sits on the servo head. By doing this, all the energy from the crash will not go directly into the servo causing it to strip, but it will just make the servo arm you previously cut to slik on the servo head. Brilliant idea, isn’t it ? Many people use some small o-rings to extra hold the arms in place, but I guess this is trial and error for each one.

Final thoughts : As I said in the beginning of this review, and have to say again, the heli is very stable indoor, so it’s really easy going without the fear of scratching the walls, so that the wife can complain about it :)
Because outside is still cold and windy I only flown it indoor, but hey, this is mainly an indoor flier, right ? If I want to fly outside I take my Master CP or my 450…Don’t’ get me wrong, this is still a collective pitch heli, so, unlike the 4 channels helis(like the V911) it can handle some wind with ease, especially in idle-up mode where rpm is higher…Also I can say that so far I don’t see the need to go brushless, even tough many people have gone this way…I know the motor is more efficient, but until it will die on me, I am happy the way it flies so far…
Being my first 6 channel mini helicopter I cannot comment how it is compared to other, but reading a lot of internet resourced, I would say it’s among the best bang for the buck micro’s.
I just finished a hover test with the stock battery untill the heli landed by itself and with the stock battery I got : 6min 30 sec, and with the extreme-productions upgrade battery which is 7 grams in weight against the stock one at 6 grams, I got 7 min 30 sec, which so far is the longest flight time I got with any heli...The only issue was that the motor was hot...

I hope you find the info in this review usefull, and until next time, I wish you happy flying and blue sky.

Below is my youtube unboxing and small review movie:


Likes:
+ very stable indoor flyer
+good flight times
+good crash resistance
+good looking

Dislikes
-landing skids still not separated like all genius community suggested to walkera
-servos are a bit expensive


The box, only mention for v2 version is the sticker

Left side view
Original Picture


Right side view

Underside view

Front view

Left side view with canopy off

Front side view with canopy off

Right side view with canopy off

Hely without canopy and battery weight

Canopy weights 2.4 grams

Servo's area

Receiver and motor view

Flight weight with canopy and stock battery

Stock battery weight


Related Posts Plugin for WordPress, Blogger...